Tuesday 28 May 2013

Gâteau Breton

Gâteau Breton or Brittany butter cake has become one my latest favorite cakes. When I first saw this recipe, I think hmm.. maybe its just another butter cake but I am glad I was wrong. Its much more than that, taste exceptional rich in butter and has a texture in between shortbread and pound cake. Kind of hard to describe, crumbly and a bit chewy.... but I can only say this cake is amazingly delicious. Although it look kind of huge but it stays good at room temperature for couple weeks and its buttery flavor gets better with time too. Okay let me start some baking now!

Ingredients of this cake is really simple, I have flour, sugar, egg yolks, pinch of baking powder,  vanilla extract and beurre salé (salted butter). The most important thing is to use a high percentage butterfat butter, luckily I have some 84% fat salted butter in hand. First thing is to blend everything in a large bowl, I use a scraper to mix everything together. Its better to use a scraper than a standing mixer, but at the end my hands are a bit tired... that's the traditional way.

Next step is a easy step. I scrape my cake dough into an eight inch fluted tart pan (a traditional shape) and smooth the top. Then glaze the top with some reserved egg yolks and use a fork to make lines on top. My Gâteau Breton looks very pretty now... everything is ready and time for baking. I baked mine in 350 F oven for about 35 to 40 minutes until the top of my cake looks crispy brown (or lighter color depends on what you would like) and its side starts pulled away from my tart pan.

My buzzer went off and now its time to get my cake out of oven. Hmm..its smells so good! I let it sits for about thirty minutes and release it from my pan. Wow! Looks perfectly pretty with a shiny layer on top, see its crumbly side too? I can't wait to try it now but have to let it cool completely. I better go do something to take my mind off about my lovely Gâteau Breton for now. What I am going to do ....?

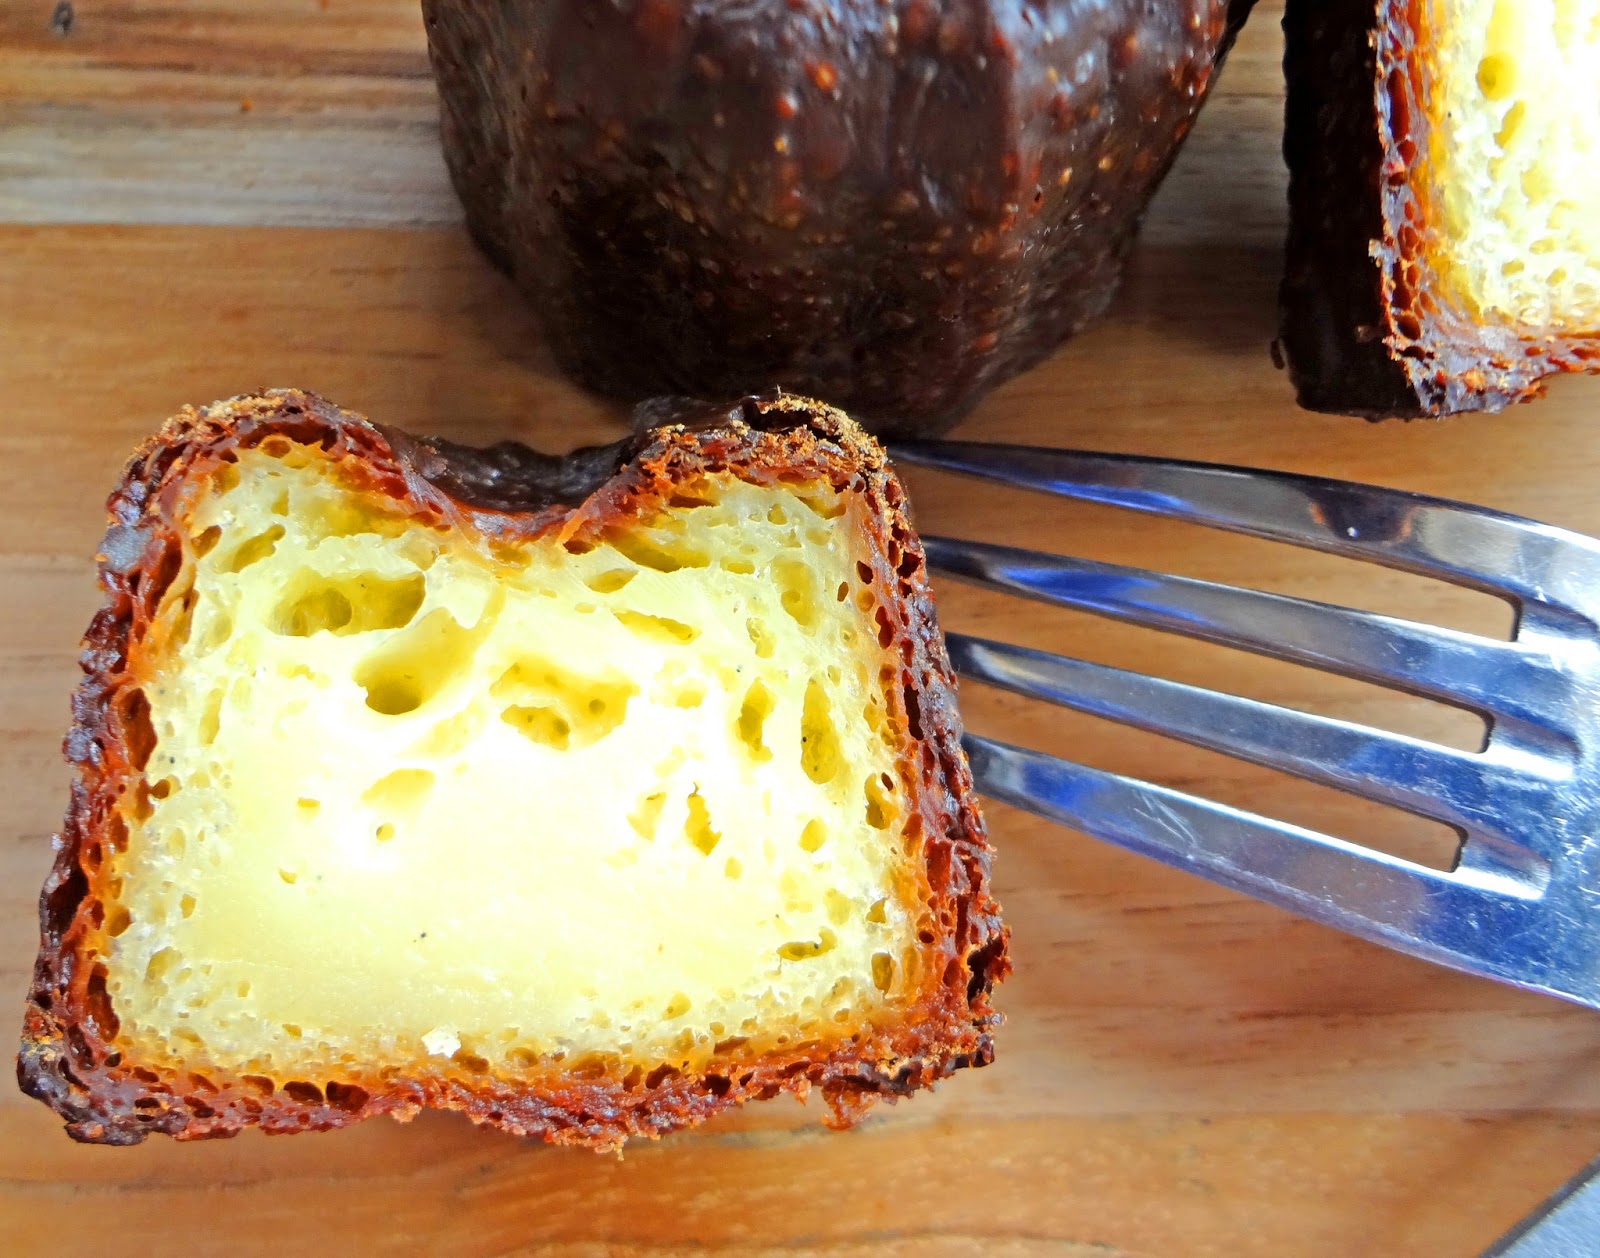
Yeah, tasting time now! I have my coffee ready, let me cut a slice to see how my cake looks. Oh, it looks perfect and smell so so good. Its rich yellow color from creamy-rich butter and egg yolks is really attractive, I can't wait and have a bite.  Hmm, taste amazing... crumbly yet a bit cakey, plus a bit caramelized outer shell make this Gâteau Breton fantastic! I hope it can last for a while...

Enjoy!

Saturday 18 May 2013

Macaron à la Rose

Macaron à la Rose... sounds like a magic tune to me! A tune that will make me happy :) I think I will never get tired of making them, they look so pretty, smell and taste so good. Whenever I am low in stock of rose macarons, its time to make another batch no matter how busy I am. This time I would like to have more intense rose with a bit fruity tease for my rose macarons. Hopefully, I make enough for this coming long-weekend... maybe have only one a day!

Its always fun and delightful to make these cute rose macarons, more the better. But I need to get another food processor to grind my almonds, maybe just to replace my old one or help me to speed up my time. I use organic rose petals for my tant pout tant as they always give me best rose flavor and a little hint of slight pink to my shells. They look nice on my silpat now and soon ready to bake... can't wait!

This couple days we have some pretty nice weather which help for baking, especially for macarons, they don't like humid weather at all.... Okay, baking is done, wow! A perfect army of rosy macaron shells are ready for service! In the mean time, let me get my fruity tease ready for them...
This time I use an intense rose ganache which has rose water and natural rose extract, but I have to be careful not making it taste like hand cream... although I love rose hand cream. To balance out sweetness of my ganache, I have raspberry gelée as my fruity tease. I really like Pierre Hermé's philosophy of playing and balancing out flavors... I love to incorporate it in my version... Lets see how my macaron à la Rose taste... hmm.. wonderful intense rose flavor... taste so amazing that make me smile!

Enjoy!

Thursday 16 May 2013

Canelés de Bordeaux, copper episode...

Here is my other post about lovely Canelés. As promised from my other post about making them with silicone mold, this time I finally get my hands on these copper molds for Canelés. Cause they are not easy to locate locally, I ordered these fantastic two inches standard Mauviel canelé molds with tinned interior online. Couldn't wait to open the box when they arrived... looks fantastic and much bigger than the mini silicone ones I use... maybe one or two is good enough for my tea time. 

See how nice the molds are... they looks so shiny, perfect and heavy too! But before I can bake anything, I have to season them first. I need to bake them with some oil in my oven for about an hour....then they are ready! 

Next step is a bit more tricky. Traditional Canelés not only have to use copper mold, and also use a kind of beewax coating in order to bake perfect Canelés. I have been struggled a bit about using beewax or not cause some recipes called for just plain butter for lining the molds. As to stick to tradition and my desire for perfect Canelés, I go with beewax coating.  Luckily, I get some organic food grade beewax... have my beewax coating ready and coat the molds slightly... they looks really nice and ready to bake.

Let me fast forward a bit... after making batter, baking for high temperature for a while and its time to see my Canelés. Since they need to be turned out rightaway after baking, I make sure I won't burn myself as the molds are extremely hot... Wow, my Canelés looks perfect! Nice dark brown colour and they smell really wonderful! Okay, let them sit a bit on the rack before I get a bite...

Omg! They taste soooo... good! A very crispy shells with rich caramelized flavor and extremely creamy custardy inner fluffy texture. I can't just have one and I ate two... hmm so satisfying! I think my copper molds really pay off for these perfect, cute and delicious Canelés, although they are expensive but worth my money. From now on... copper mold  is my way for Canelés! Maybe I should get some more molds...


Enjoy!

Sunday 12 May 2013

Japonais Sésame Noir Grillées Macarons

Roasted Japanese black sesame... a very interesting ingredient, I should say you either love it or not crazy about it. But I really love it, an amazing seeds which taste both good for savory and sweet stuff. Of course for an adventurous girl like me I would definitely try it in my favorite treats... macarons... and this wonderful ingredient turn out into a great, bold and amazing taste!

Making this asian flavor macaron shells is fun and exciting. In order to have strong flavor, I incorporate enough roasted black sesame in my tant pout tant. Let me sprinkle more on top, maybe a little overkill but they do looks nice!

Baking these little cuties is straight forward, but I need to keep and eye don't let them burnt! Okay, here they are done...wow! My roasted Japanese black sesame macaron shells looks perfect, let me assemble them together and I can taste them very soon... 
Making filling for these cuties took me a while to figure out what will be good. Eventually, I find roasted black sesame ganache goes really well with these amazing shells. Now, tasting time... just a small bite... a huge burst of roasted Japanese black sesame is dancing in my mouth! Let me make a green tea to go with this little treat!

Enjoy!

Saturday 11 May 2013

Gâteau L'Opéra

This week is a super busy Mother's Day week... I was baking like there is no tomorrow in my kitchen for my macarons!  Thank you everyone's support for my sweeties :) After all my hard work, I have to make a nice treat for myself... a L'Opéra. I know I need more sleep but I do really need to treat myself! I love Opera very much, although is on the rich side, I just try not to eat more than two pieces in one time...but this one maybe more! Traditionally, this cake use almond jaconde, layered with coffee buttercream, ganache , soaked with coffee syrup and covered in a chocolate glaze... of course I always give my sweets a twist.. like a new life. Here is my version...

you need...

  • one half sheet jaconde de noisette (hazelnut jaconde) cooled
  • 150 g pistache crème au beurre (pistachio buttercream)
  • 300 g café crème au beurre (coffee buttercream)
  • 120 g crème fraîche ganache (I use 66% Valrhona Caraibe)
  • 50 g chocolate lacquer glaze (I use 100% Valrhona cocoa)
  • 70 ml coffee syrup
  • one Callebaut marble callet and four Valrhona dark chocolate crispy pearls (optional)
directions...
  • cut the cooled hazelnut jaconde into four pieces
  • lie one piece of jaconde on a parchment lined sheet and soaked with syrup
  • spread  crème fraîche ganache on your syrup soaked jaconde and let set a bit
  • gently lay second layer of jaconde on top and soaked it with syrup 
  • spread half of your coffee buttercream on your second layer and let set
  • lay your third layer of jaconde on top again and soak it with syrup...I know kind of repeating myself
  • spread your pistachio buttercream on top and let set
  • lay your last layer jaconde on top, soaked with syrup and spread remaining coffee buttercream on top, smooth your buttercream as smooth as possible and let your cake rest in fridge until it firm up
  • warm up your chocolate lacquer glaze just slight warm and pourable, put your firmed up cake on a rack and glaze it, and let set in your fridge for a few hours (don't worry about the sides cause we'll trim it later)
  • use a sharp and warm knife and trim four edges (trimmings are tasty as your cake, just not as pretty), decorate your lovely cake and you're done!
Wow! A lovely glossy and pretty cake! I wait till next day as I know it will certainly taste better after all the flavors mellow together... Hmm, let me try a bite... sooooo good, rich, smooth, amazing blend of nutty hazelnut, pistachio, chocolate and coffee together! If you love coffee and nuts you will certainly love Gâteau L'Opéra... it goes perfectly with my Darjeeling tea, maybe I should have one always ready in my fridge!

Enjoy!

Friday 3 May 2013

Ispahan Macarons

Ispahan... originally a word from Persian called Isfahan - capital of Isfahan province of Iran. Maybe the flavors rose, lychee, raspberry?... inspired Pierre Hermé created an outstanding and amazing dessert in the pastry universe. I should say this is 'the one' which pull me into the abyss of macaron! I can't tell how many time I've made this amazing macaron and sometimes the bigger sister... a two to three inches macarons filled with all my goodies and fresh raspberries. I can tell I never get tired of making them , especially this smaller and portable version... always set aside a few just for myself!

I always use organic rose petals for my rose macaron shells. They looks nice and their aroma is exceptional... Good by themselves just for snack  but of course these cuties will become amazing Ispahan macarons... hmm I ate a couple not so perfect looking one...can't help it!

Time to put these cuties together. I made some organic raspberry gelée ahead of time and cut it into small pieces. Instead of using rose and lychee cream in my other post about rose et litchi macaronsI use rose and lychee ganache for this amazing Ispahan. My a bit acidic and fruity raspberry gelée go really with rose & lychee ivoire ganache! Tasting time! Omg I love Ispahan so so much... rose, lychee and raspberry melt in my mouth, like magic... even my body feels lighter now!


Enjoy!

Thursday 2 May 2013

Canelés de Bordeaux, the beginning...

Canelés de Bordeaux or Cannelés Bordelais... are one of my favorite treats other than macarons; delicious, enclosed by a caramelized shell with a very rich, custardy, vanilla and rum interior... They may sometimes looks dark brown, mahogany or even nearly black, kind of unattractive, but they are really amazing! These little treat has a long history, most believe it was originally invented by nuns in Bordeaux making use of donated eggs yolks and rum... and the rest is history. I love them so much so I have a separate topic about Canelés here! But searching for these cuties is not an easy task, only one or two places in Toronto sell these little treats. And after I've tried them they are just okay. I can't blame them because Canelés taste the best a few hours after they are baked, maybe they are not as popular as other sweeties. So another adventure for me! First thing first is to get the special mold to bake them, but of course I am not going to get that special copper mold (not yet!)... so silicone it is to try out. I got a couple molds from amazon for making mini ones, then another hurdle come up... the recipe. Recipe of Canelés is a bit different from many small cakes I've made before, it called for a very very thin batter made of milk, eggs, sugar, rum, vanilla and flour, then bake at a high temperature for a long time...easy? No, after reading and reading of books and search online like... Paula Wolfert, Chez Pim, Pierre Hermé, Ladurée...etc. And after many hours of tears and sweat, I settle with the one by Pierre Hermé, also recommended by Chez Pim but I change a little. I am quite happy with it and they taste great! However, you can still see from my photos some looks quite good with a nice caramelized shells but some are not... I think probably is due to my mini silicone molds which cause uneven baking, maybe my oven...etc?? My next challenge will be in a proper copper mold... more sweat!

for about 45 mini Canelés (using silicone mold) you need...
(recipe adapted from Pierre Hermé and Chez Pim)
  • 500 g organic whole milk
  • 50 g butter
  • 100 g cake flour
  • 250 g confectioners sugar
  • 3 g salt
  • two large eggs
  • two large egg yolks
  • 60 ml Rum
  • one vanilla pod or four teaspoons vanilla extract (extract can add at the end)
batter preparation...
  • heat milk, butter and split vanilla pod together until it boils and cool till warm to touch
  • sift cake flour, sugar and salt together in a big bowl
  • slightly beat eggs and yolks together and add into flour-sugar mixture
  • add your warm milk mixture into eggs and flour mixture (if you use vanilla pod, just take it out)
  • blend your mixture until homogeneous and strain it into another container
  • add in Rum (and vanilila extract) and mix to become a very thin liquidy batter
  • chill in your fridge at least 24 hours until baking
baking time...
  • preheat your oven to 475 F
  • slightly spray silicone molds with non-stick spray (seems work best for me)
  • transfer your chilled batter into a small pouring cup like pyrex
Pour your batter carefully into each mini mold, you may need to stir your batter form time to time since it may settle a bit. If you have some batter dripped outside your mold, just wipe it clean.  See they looks nice and neat and ready to go into oven. Each mold can make 18 mini Canelés and I bake two trays at a time, so you'll have 36 cuties very soon!

Another thing is to fill up your mold just about 5 mm from the top, because they will puff up a bit during baking and you don't want to see they climb out! It happened before and its kind of tragedy to see that happen... you can see how thin the batter and they are so small, about 30 g each, but don't worry, they'll soon come out nice and yummy!

Now, put them in your pre-heated oven, turn down to 450 F and bake for 15 minutes (turn once), then keep baking for another 35 to 40 minutes at 375 F (turn twice). When they turn to dark brown color (or even nearly dark dark brown like black if you like), then your Canelés are ready! Turn them out rightaway and let them cool for about 30 minutes, make some coffee and tea in the meantime for you treats!

Okay, tasting time now! Caramelized crispy shell, rum and vanilla flavored custard inner centre is amazing! I can eat like ten in a row... make me thinking spending lots of time and make not a lot... definitely worth my time, maybe I finished them too fast! Hmm I should try make those normal 2 inches size Canelés, of course I won't use a bigger silicone mold again but instead a proper copper mold. Just simply because I found no matter changing my recipe, playing with temperature, baking time, oven issue... not all my Canelés come out from silicone mold perfect. On a mission to make my perfect Canelés, I will try traditional copper molds, I know they are expensive, still sounds like a good investment for me, can't help it... they are coming soon!
Enjoy!